

The Ultimate Guide: Top Tips to Remove Bubbles from Epoxy Resin
Epoxy resin is a popular material used in arts, crafts, and various DIY projects. However, one common challenge that many creators face is the appearance of unwanted bubbles in their epoxy resin creations. In this blog post, we will explore some of the best tips and techniques to help you remove bubbles from epoxy resin and achieve flawless results.
1. Choose the Right Work Environment:
Creating a bubble-free epoxy resin project starts with ensuring the right work environment. Opt for a clean, dust-free area with low humidity. This will help minimize the chances of dust particles or moisture getting trapped in the resin and forming bubbles.
2. Mix Thoroughly and Slowly:
Properly mixing the epoxy resin and hardener is crucial to prevent bubbles. Carefully follow the manufacturer's instructions and take your time while stirring the components together. Avoid mixing too vigorously, as this can introduce additional air into the mixture.
3. Allow for Degassing Time:
After mixing the epoxy resin and hardener, allow the mixture to sit for a few minutes. This will help any trapped air bubbles rise to the surface, making it easier to remove them before pouring the resin into your mold or surface.
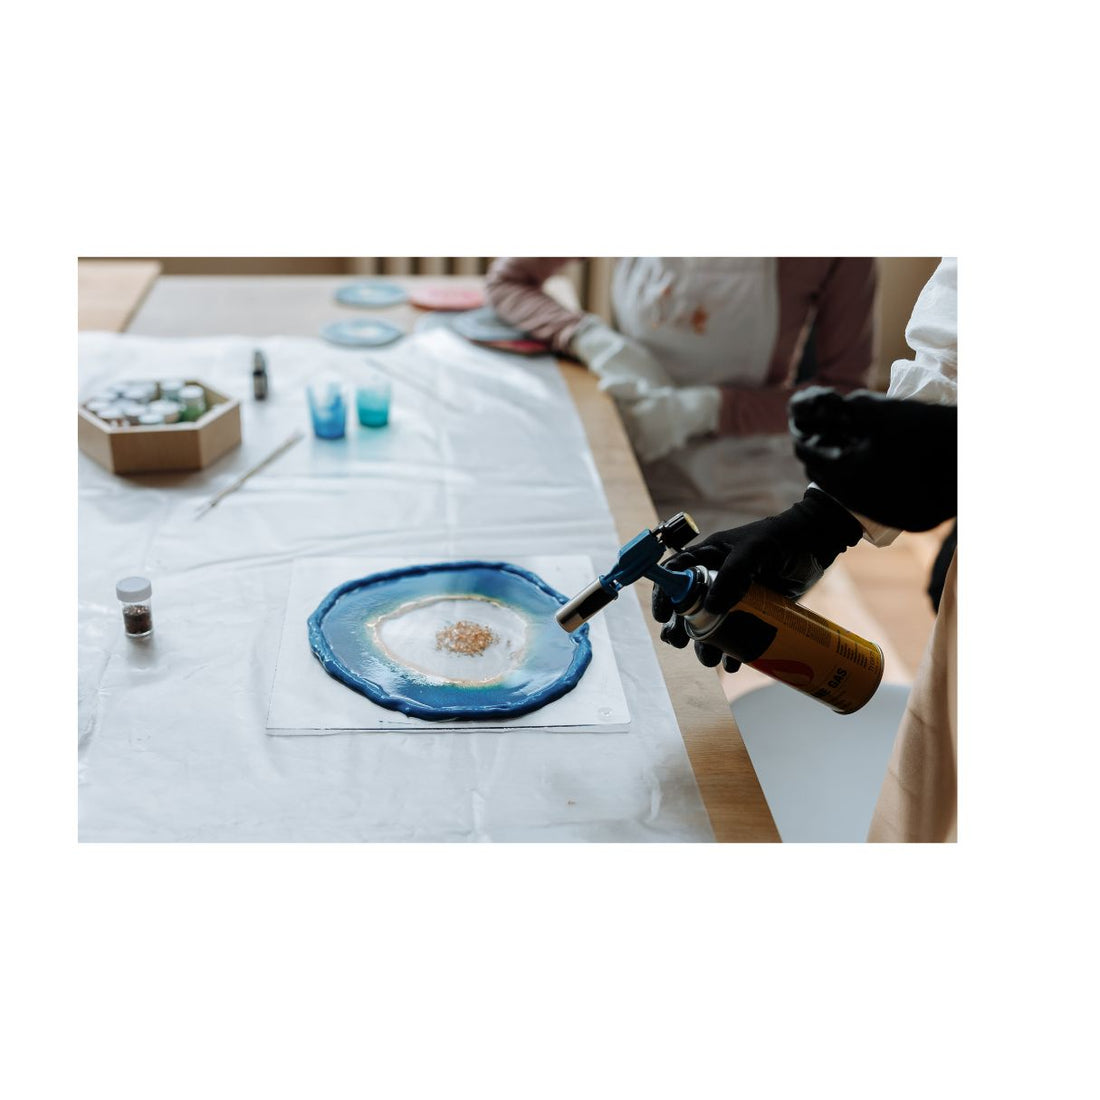
4. Use a Heat Gun or Torch:
A heat gun or torch is an effective tool for removing bubbles from epoxy resin. Hold the heat gun or torch several inches above the resin surface and move it in a circular motion. The heat will cause the bubbles to rise and pop, resulting in a smooth finish. Be cautious not to hold the heat source too close or for too long in one spot to avoid scorching or damaging the resin.
5. Apply Light Heat with a Hair Dryer:
If you don't have a heat gun or torch, a hair dryer can also be used to remove bubbles from epoxy resin. Set the hairdryer on the lowest heat setting and gently blow over the resin surface. The warm air will help the bubbles rise and dissipate.
6. Use a Toothpick or Pin:
For smaller bubbles that may still remain after using heat, a toothpick or pin can be handy. Gently poke the bubbles to release the trapped air. Take care not to scratch the surface or disturb the surrounding resin.
7. Vacuum Chamber or Pressure Pot:
For larger resin projects or professional applications, utilizing a vacuum chamber or pressure pot can help eliminate bubbles more effectively. These tools use either vacuum or pressure to remove trapped air from the resin before it cures, resulting in bubble-free results.
8. Practice Patience:
Remember, removing bubbles from epoxy resin is a process that requires patience and practice. Don't rush or get discouraged if bubbles persist. With each attempt, you'll gain experience and improve your techniques.
Conclusion:
Removing bubbles from epoxy resin can be achieved with the right techniques and tools. By following these top tips, you'll increase your chances of achieving bubble-free, stunning epoxy resin creations. Remember to work in a suitable environment, mix carefully, use heat sources wisely, and take advantage of helpful tools like toothpicks, vacuum chambers, or pressure pots. With practice, your epoxy resin projects will showcase a flawlessly smooth and professional finish.
For more information please email us or reach out to us via Social Media @unityresin! Unity Resin is your best choice for epoxy resin art, resin supplies, pigment pastes and more!